

Use Dagster and W&B together to orchestrate your MLOps pipelines and maintain ML assets, so you can track experiments, manage data, and run training jobs from within your existing Dagster workflows. The integration with W&B lets you do the following within Dagster:Documentation Index
Fetch the complete documentation index at: https://wb-21fd5541-style-guide-models-integrations-20260527-015516.mintlify.app/llms.txt
Use this file to discover all available pages before exploring further.
- Create and use a W&B Artifact.
- Use and create Registered Models in W&B Registry.
- Run training jobs on dedicated compute using W&B Launch.
- Use the wandb client in ops and assets.
wandb_resource: a Dagster resource used to authenticate and communicate with the W&B API.wandb_artifacts_io_manager: a Dagster IO Manager used to consume W&B Artifacts.
Before you get started
Before you configure the integration, gather the W&B credentials and identifiers it needs to authenticate and route your runs. You need the following resources to use Dagster within W&B:- W&B API Key.
- W&B entity (user or team): An entity is a username or team name where you send W&B Runs and Artifacts. Create your account or team entity in the W&B App UI before you log runs. If you don’t specify an entity, the run goes to your default entity, which is usually your username. Change your default entity in your settings under Project Defaults.
- W&B project: The name of the project where W&B Runs are stored.
Set up your API key
The integration authenticates with the W&B API using an API key, which you must make available to Dagster as an environment variable.- Log in to W&B. If you’re using W&B Server, ask your admin for the instance host name.
- Create an API key at User Settings. For a production environment, use a service account to own that key.
- Set an environment variable for that API key:
export WANDB_API_KEY=[YOUR_KEY].
wandb_resource.
The following examples demonstrate where to specify your API key in your Dagster code. Specify your entity and project name within the wandb_config nested dictionary. You can pass different wandb_config values to different ops or assets if you want to use a different W&B Project. For more information about possible keys you can pass, see the following Configuration section.
- Config for @job
- Config for @repository using assets
Example configuration for
@job:Configuration
The integration provides a W&B-specific Dagster resource and IO Manager with the following configuration options.wandb_resource: Dagster resource used to communicate with the W&B API. It authenticates automatically using the provided API key. Properties:api_key: (str, required): a W&B API key necessary to communicate with the W&B API.host: (str, optional): the API host server you want to use. Only required if you’re using W&B Server. Defaults to the Public Cloud host,https://api.wandb.ai.
wandb_artifacts_io_manager: Dagster IO Manager to consume W&B Artifacts. Properties:base_dir: (int, optional) Base directory used for local storage and caching. W&B Artifacts and W&B Run logs are written to and read from that directory. By default, it uses theDAGSTER_HOMEdirectory.cache_duration_in_minutes: (int, optional) Defines how long to keep W&B Artifacts and W&B Run logs in local storage. The cache removes only files and directories that haven’t been opened for that amount of time. Cache purging happens at the end of an IO Manager execution. Set it to 0 to turn off caching completely. Caching improves speed when an Artifact is reused between jobs running on the same machine. Defaults to 30 days.run_id: (str, optional): A unique ID for this run, used for resuming. It must be unique in the project, and if you delete a run you can’t reuse the ID. Use the name field for a short descriptive name, or config for saving hyperparameters to compare across runs. The ID can’t contain the following special characters:/\#?%:..Set the Run ID when you’re doing experiment tracking inside Dagster to allow the IO Manager to resume the run. By default, it’s set to the Dagster Run ID, for example,7e4df022-1bf2-44b5-a383-bb852df4077e.run_name: (str, optional) A short display name for this run to help you identify it in the UI. By default, it is a string with the following format:dagster-run-[8 first characters of the Dagster Run ID]. For example,dagster-run-7e4df022.run_tags: (list[str], optional): A list of strings that populates the list of tags on this run in the UI. Tags are useful for organizing runs together or applying temporary labels likebaselineorproduction. You can add and remove tags in the UI, or filter down to runs with a specific tag. Any W&B Run used by the integration has thedagster_wandbtag.
Use W&B Artifacts
This section explains how the integration uses a Dagster IO Manager to bridge W&B Artifacts and Dagster ops and assets. The integration with W&B Artifact relies on a Dagster IO Manager. IO Managers are user-provided objects that store the output of an asset or op and load it as input to downstream assets or ops. For example, an IO Manager might store and load objects from files on a filesystem. The integration provides an IO Manager for W&B Artifacts. This lets any Dagster@op or @asset create and consume W&B Artifacts directly. The following example shows an @asset that produces a W&B Artifact of type dataset containing a Python list.
@op, @asset, and @multi_asset with a metadata configuration to write Artifacts. Similarly, you can also consume W&B Artifacts even if they were created outside Dagster.
Write W&B Artifacts
The following sections describe how to produce W&B Artifacts from Dagster ops and assets, including the supported return types and how to configure the resulting Artifact. Before continuing, make sure you understand how to use W&B Artifacts. See the Guide on Artifacts. Return an object from a Python function to write a W&B Artifact. W&B supports the following objects:- Python objects (
int,dict,list, and so on) - W&B objects (Table, Image, Graph, and so on)
- W&B Artifact objects
@asset):
- Python objects
- W&B Object
- W&B Artifact
Anything that can be serialized with the pickle module is pickled and added to an Artifact created by the integration. The content is unpickled when you read that Artifact inside Dagster (see Read artifacts for more details).W&B supports multiple Pickle-based serialization modules (pickle, dill, cloudpickle, joblib). You can also use more advanced serialization like ONNX or PMML. Refer to the Serialization section for more information.
Configuration
You can set a configuration dictionary calledwandb_artifact_configuration on an @op, @asset, and @multi_asset. Pass this dictionary in the decorator arguments as metadata. This configuration is required to control the IO Manager reads and writes of W&B Artifacts.
For @op, it’s located in the output metadata through the Out metadata argument.
For @asset, it’s located in the metadata argument on the asset.
For @multi_asset, it’s located in each output metadata through the AssetOut metadata arguments.
The following code examples demonstrate how to configure a dictionary on an @op, @asset, and @multi_asset computations:
- Example for @op
- Example for @asset
- Example for @multi_asset
Example for
@op:name: (str) A human-readable name for this artifact that you can use to identify it in the UI or reference it inuse_artifactcalls. Names can contain letters, numbers, underscores, hyphens, and dots. The name must be unique across a project. Required for@op.type: (str) The type of the artifact, used to organize and differentiate artifacts. Common types include dataset or model, but you can use any string containing letters, numbers, underscores, hyphens, and dots. Required when the output isn’t already an Artifact.description: (str) Free text that describes the artifact. The description is rendered as markdown in the UI, so it’s a good place for tables, links, and so on.aliases: (list[str]) An array containing one or more aliases you want to apply on the Artifact. The integration also adds the “latest” tag to that list whether it’s set or not. Use aliases to manage versioning of models and datasets.add_dirs: (list[dict[str, Any]]): An array containing configuration for each local directory to include in the Artifact.add_files: (list[dict[str, Any]]): An array containing configuration for each local file to include in the Artifact.add_references: (list[dict[str, Any]]): An array containing configuration for each external reference to include in the Artifact.serialization_module: (dict) Configuration of the serialization module to use. Refer to the Serialization section for more information.name: (str) Name of the serialization module. Accepted values:pickle,dill,cloudpickle,joblib. The module must be available locally.parameters: (dict[str, Any]) Optional arguments passed to the serialization function. It accepts the same parameters as the dump method for that module. For example,{"compress": 3, "protocol": 4}.
- W&B side: the source integration name and version, the Python version used, the pickle protocol version, and more.
- Dagster side:
- Dagster Run ID
- W&B Run: ID, name, path, URL
- W&B Artifact: ID, name, type, version, size, URL
- W&B Entity
- W&B Project
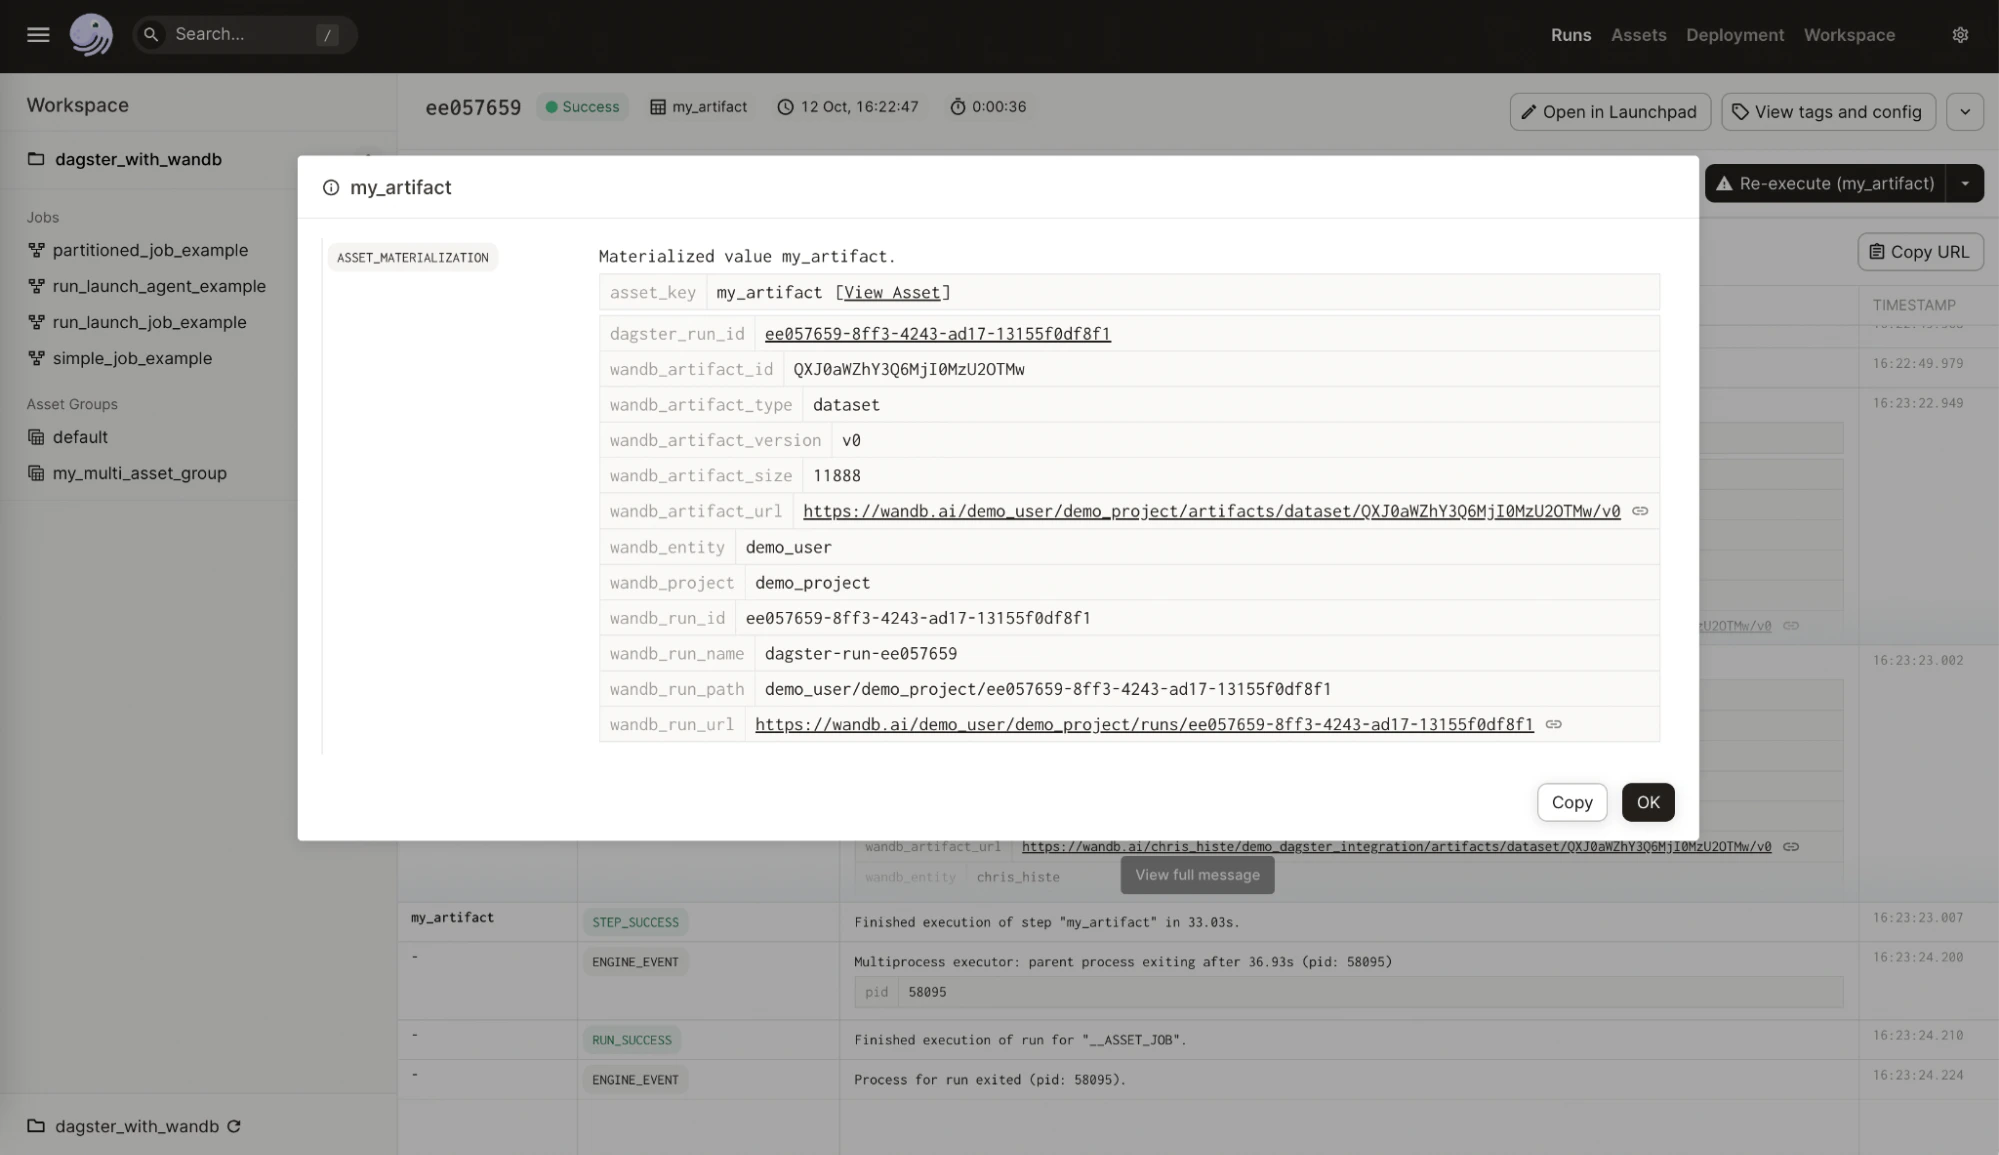
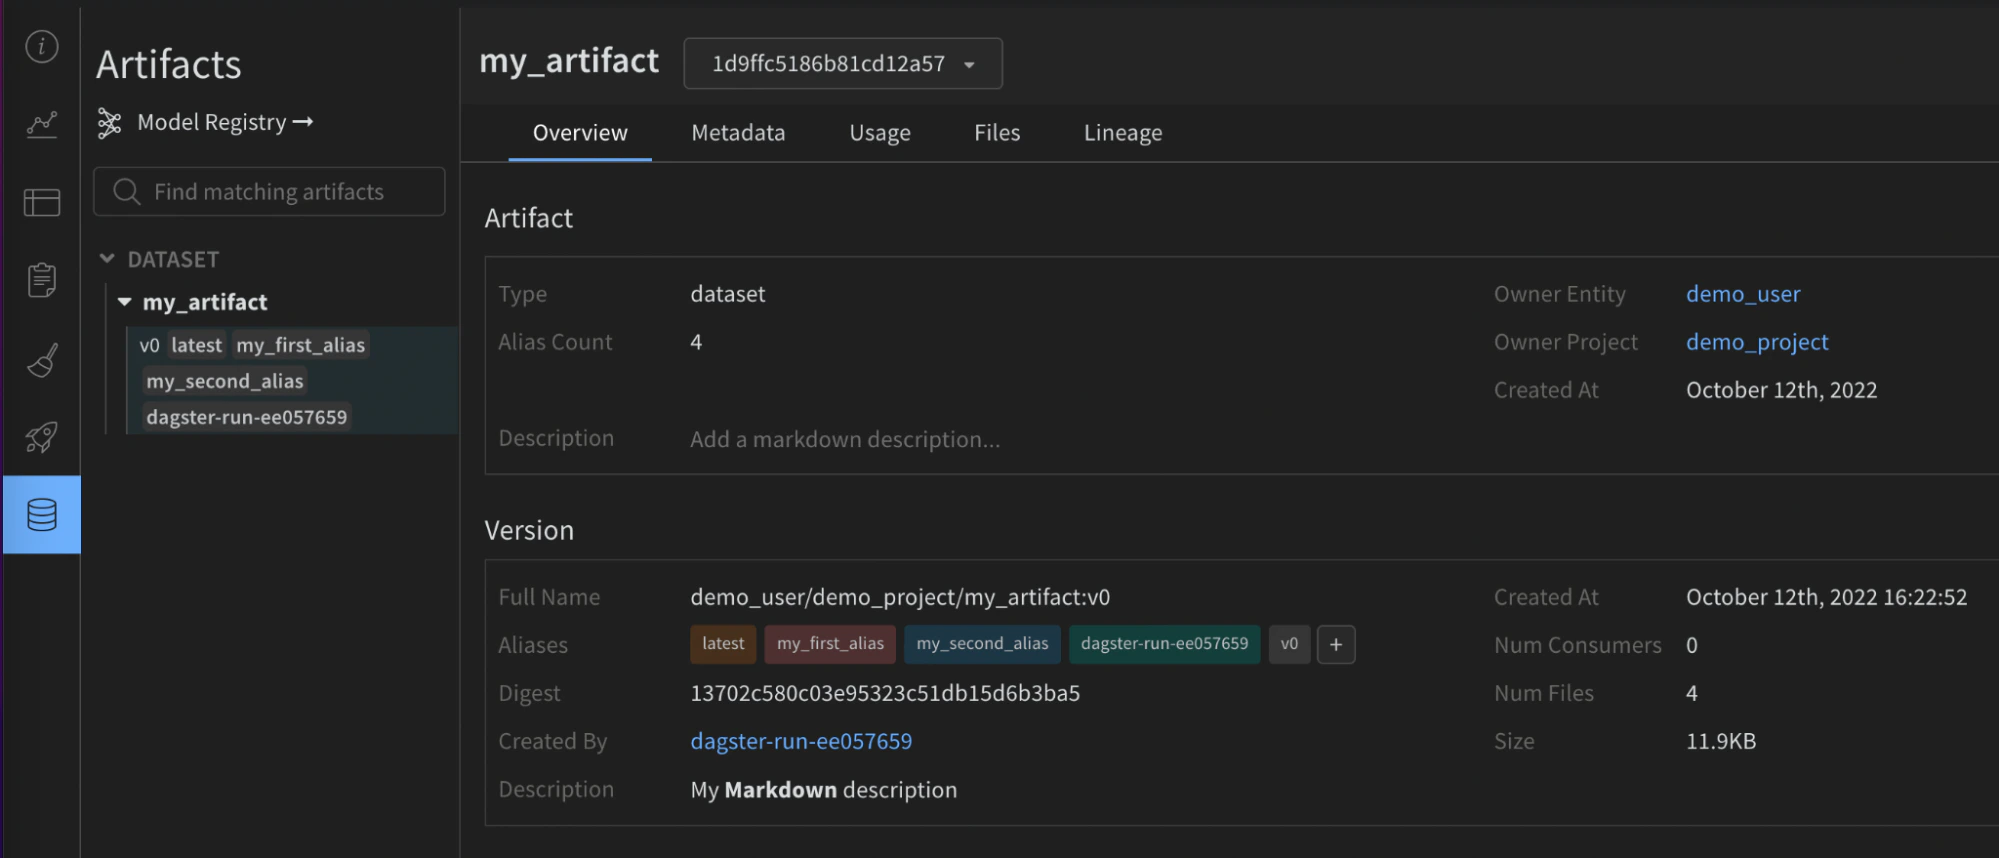
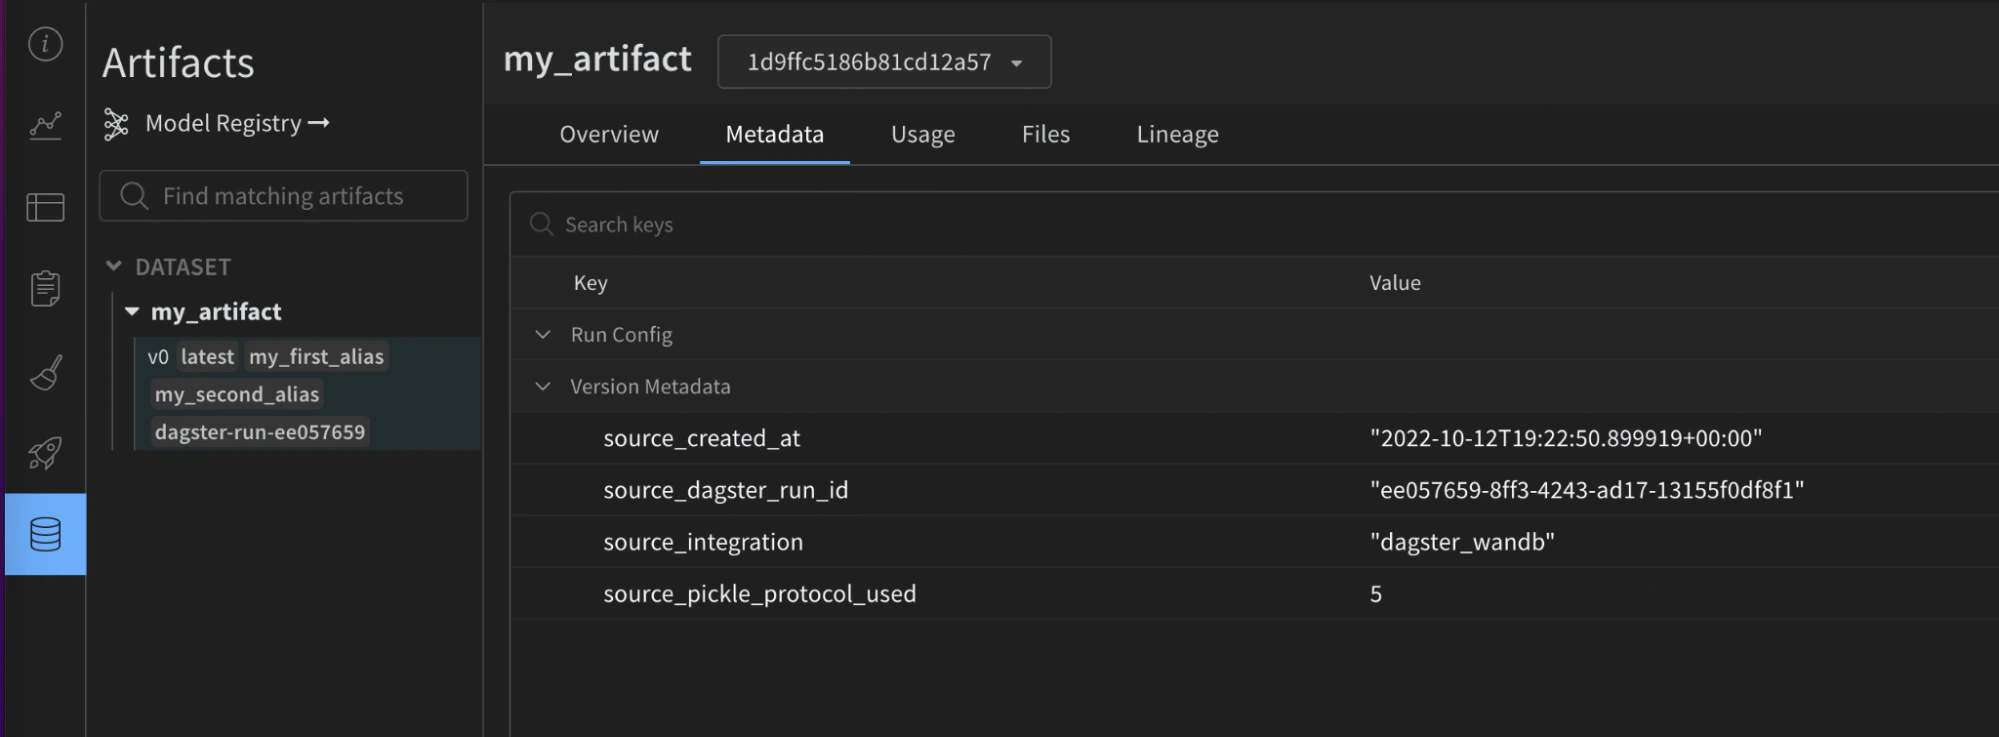
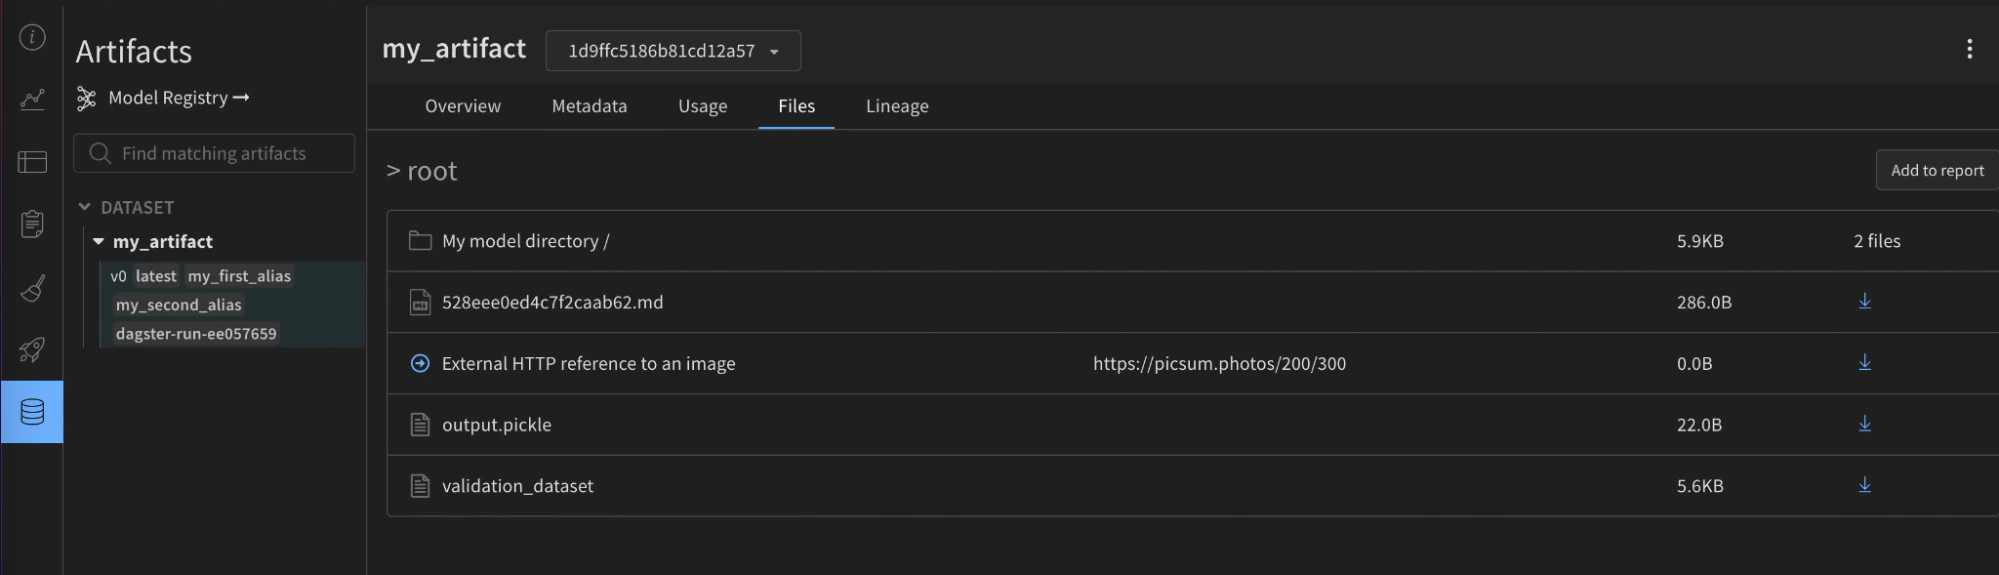
If you use a static type checker like mypy, import the configuration type definition object using the following:
Use partitions
The integration directly supports Dagster partitions. The following is an example with a partitioned usingDailyPartitionsDefinition:
my_daily_partitioned_asset.2023-01-01, my_daily_partitioned_asset.2023-01-02, or my_daily_partitioned_asset.2023-01-03. Assets that are partitioned across multiple dimensions show each dimension in dot-delimited format. For example, my_asset.car.blue.
The integration doesn’t allow for the materialization of multiple partitions within one run. You need to perform multiple runs to materialize your assets. You can execute this in Dagit when you’re materializing your assets.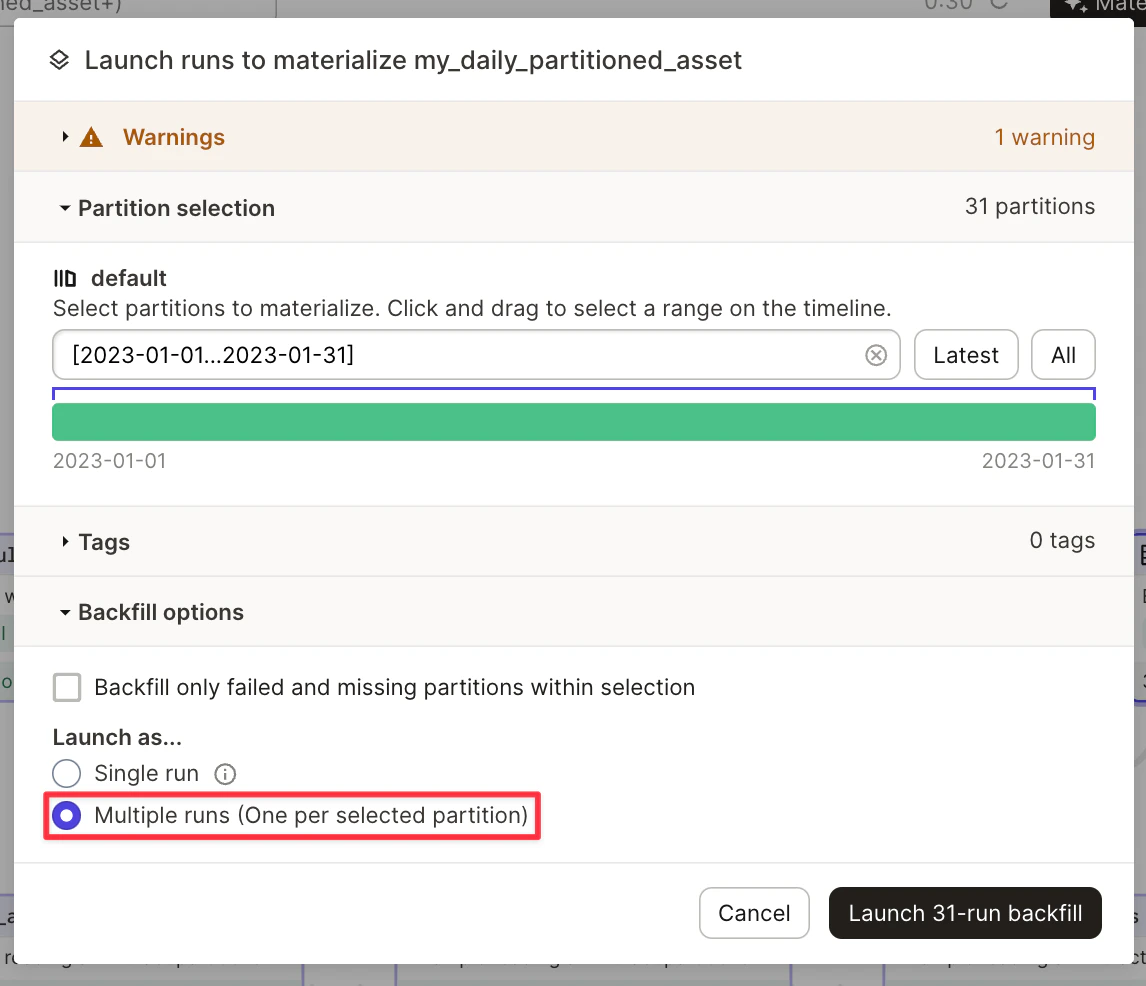
Advanced usage
For advanced usage, see the following examples:Read W&B Artifacts
Now that you can write Artifacts from Dagster, the following sections describe how to consume them as inputs to downstream ops and assets. Reading W&B Artifacts is similar to writing them. You can set a configuration dictionary calledwandb_artifact_configuration on an @op or @asset. The only difference is that you set the configuration on the input instead of the output.
For @op, it’s located in the input metadata through the In metadata argument. You need to explicitly pass the name of the Artifact.
For @asset, it’s located in the input metadata through the Asset In metadata argument. Don’t pass an Artifact name because the name of the parent asset should match it.
If you want a dependency on an Artifact created outside the integration, use SourceAsset. It always reads the latest version of that asset.
The following examples demonstrate how to read an Artifact from various ops.
- From an @op
- Created by another @asset
- Artifact created outside Dagster
Reading an artifact from an
@op:Configuration
The following configuration indicates what the IO Manager should collect and provide as inputs to the decorated functions. The following read patterns are supported:- To get a named object contained within an Artifact, use
get:
- To get the local path of a downloaded file contained within an Artifact, use
get_path:
- To get the entire Artifact object (with the content downloaded locally):
get: (str) Gets the W&B object located at the artifact relative name.get_path: (str) Gets the path to the file located at the artifact relative name.
Serialization configuration
By default, the integration uses the standard pickle module, but some objects aren’t compatible with it. For example, functions with yield raise an error if you try to pickle them. W&B supports more Pickle-based serialization modules (dill, cloudpickle, joblib). You can also use more advanced serialization like ONNX or PMML by returning a serialized string or creating an Artifact directly. The right choice depends on your use case. Refer to the available literature on this subject.Pickle-based serialization modules
You can configure the serialization used through theserialization_module dictionary in the wandb_artifact_configuration. Make sure the module is available on the machine running Dagster.
The integration automatically detects which serialization module to use when you read that Artifact.
The supported modules are pickle, dill, cloudpickle, and joblib.
Here’s a simplified example that creates a “model” serialized with joblib and then uses it for inference.
Advanced serialization formats (ONNX, PMML)
Interchange file formats like ONNX and PMML are common. The integration supports those formats, but it requires a bit more work than Pickle-based serialization. You can use these formats with one of the following methods:- Convert your model to the selected format, then return the string representation of that format as if it were a normal Python object. The integration pickles that string. You can then rebuild your model using that string.
- Create a new local file with your serialized model, then build a custom Artifact with that file using the
add_fileconfiguration.
Use partitions
The integration directly supports Dagster partitions. You can selectively read one, multiple, or all partitions of an asset. All partitions are provided in a dictionary, with the key and value representing the partition key and the Artifact content, respectively.- Read all partitions
- Read specific partitions
This reads all partitions of the upstream
@asset, which are given as a dictionary. In this dictionary, the key and value correlate to the partition key and the Artifact content, respectively.metadata, configures how W&B interacts with different artifact partitions in your project.
The object metadata contains a key named wandb_artifact_configuration which further contains a nested object partitions.
The partitions object maps the name of each partition to its configuration. The configuration for each partition can specify how to retrieve data from it. These configurations can contain different keys, namely get, version, and alias, depending on the requirements of each partition.
Configuration keys
The following configuration keys are supported:get: Thegetkey specifies the name of the W&B Object (Table, Image, and so on) to fetch the data from.version: Use theversionkey when you want to fetch a specific version of the Artifact.alias: Thealiaskey lets you get the Artifact by its alias.
Wildcard configuration
The wildcard"*" stands for all non-configured partitions. This provides a default configuration for partitions that aren’t explicitly mentioned in the partitions object.
For example:
default_table_name.
Specific partition configuration
You can override the wildcard configuration for specific partitions by providing their specific configurations using their keys. For example:yellow, data is fetched from the table named custom_table_name, overriding the wildcard configuration.
Versioning and aliasing
For versioning and aliasing purposes, you can provide specificversion and alias keys in your configuration.
For versions:
v0 of the orange Artifact partition.
For aliases:
default_table_name of the Artifact partition with the alias special_alias (referred to as blue in the configuration).
Advanced usage
To view advanced usage of the integration, refer to the following full code examples:Use W&B Launch
The following sections describe how to combine the Dagster integration with W&B Launch to run training jobs on dedicated compute, either locally or remotely. Before continuing, make sure you understand how to use W&B Launch. See the Guide on Launch. The Dagster integration helps with:- Running one or multiple Launch agents in your Dagster instance.
- Executing local Launch jobs within your Dagster instance.
- Remote Launch jobs on-prem or in a cloud.
Launch agents
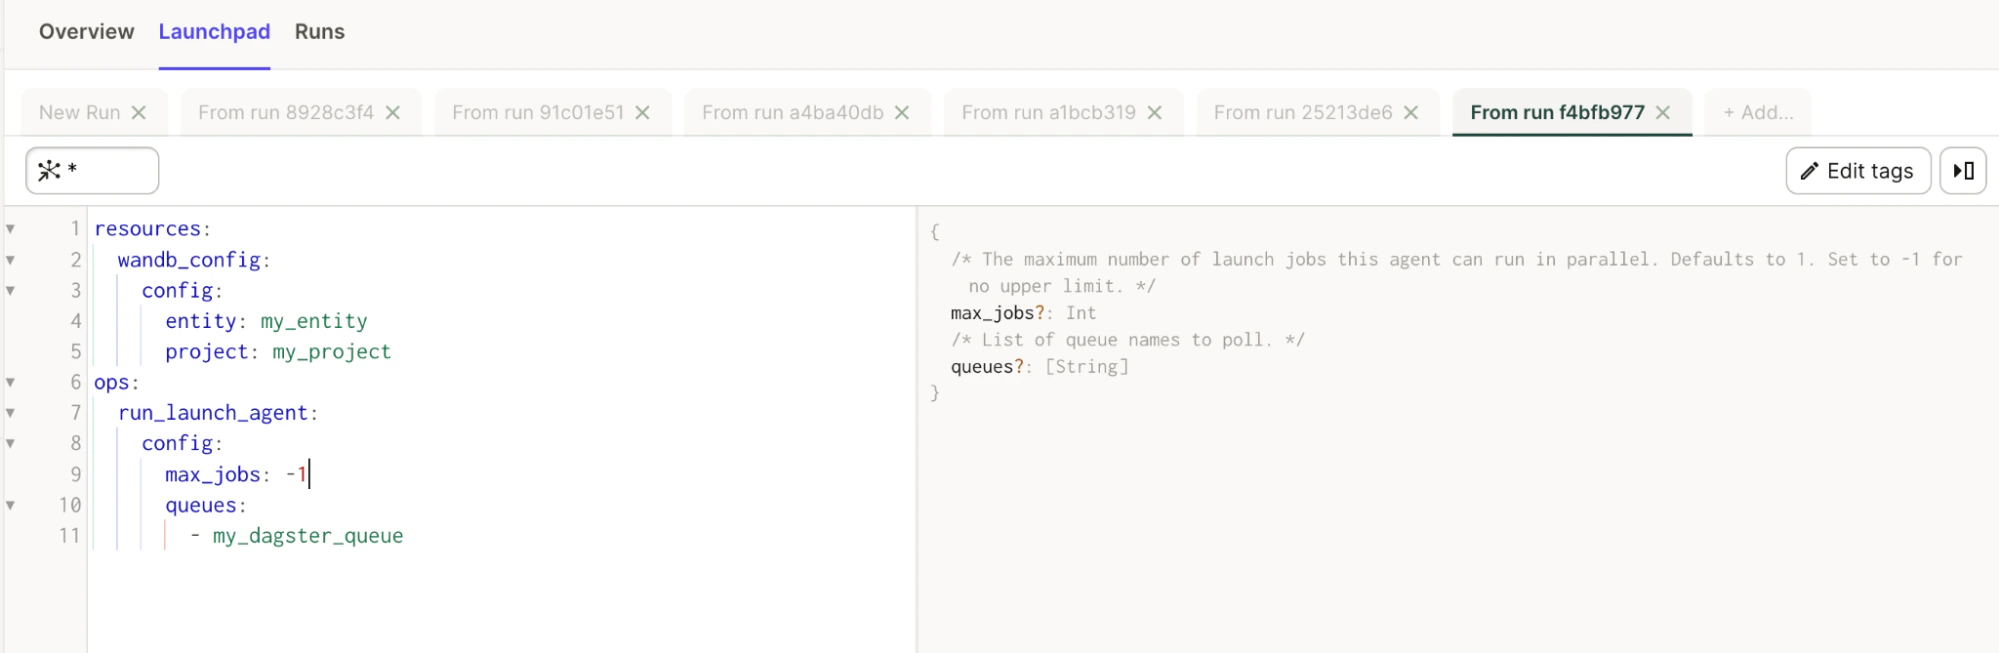
The integration provides an importable@op called run_launch_agent. It starts a Launch Agent and runs it as a long-running process until stopped manually.
Agents are processes that poll launch queues and execute the jobs (or dispatch them to external services to be executed) in order.
Refer to the Launch page.
You can also view descriptions for all properties in Launchpad.
Launch jobs
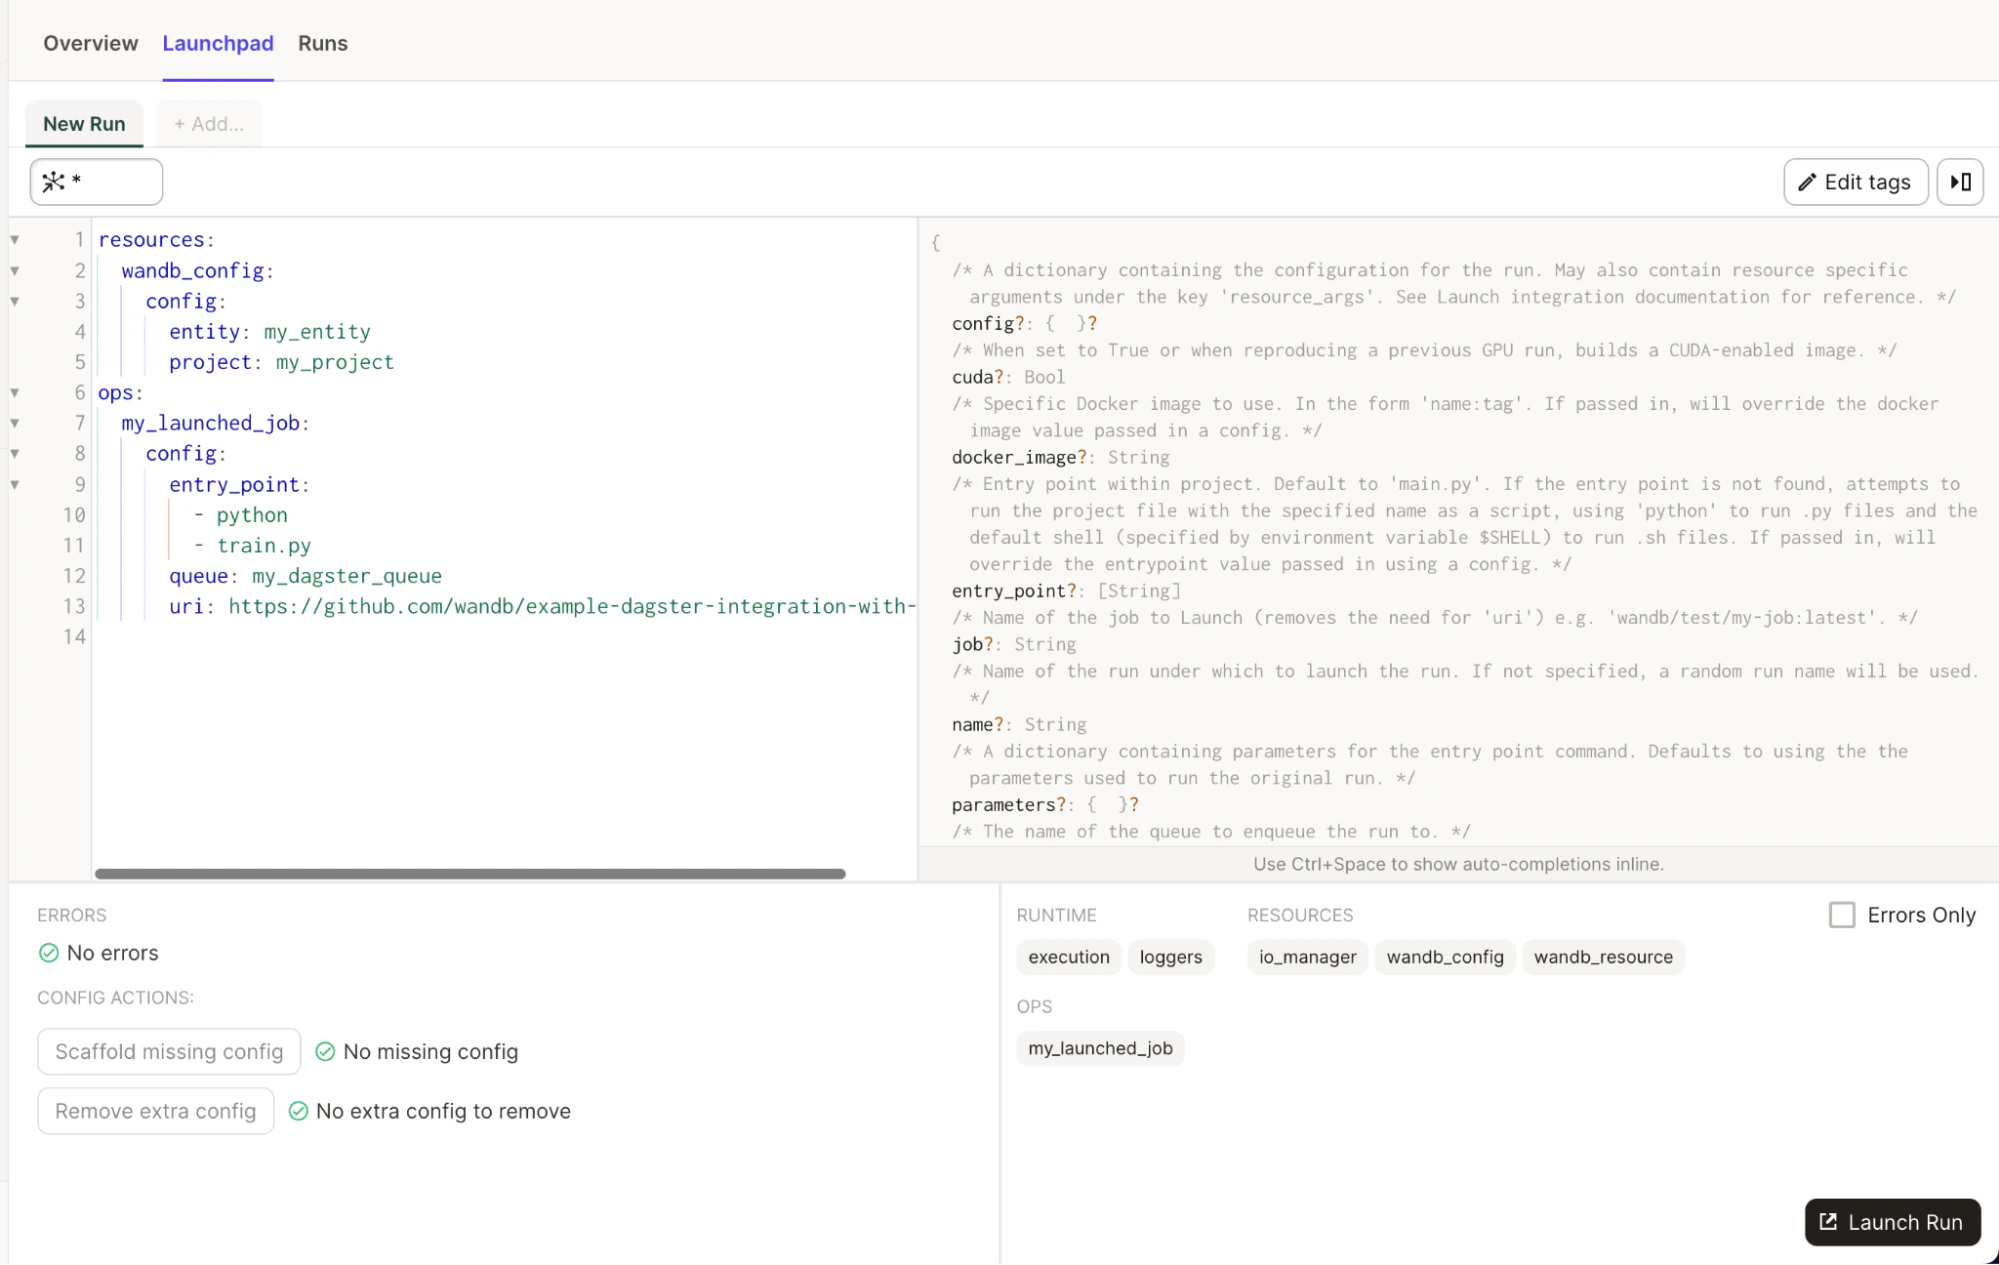
The integration provides an importable@op called run_launch_job. It executes your Launch job.
A Launch job is assigned to a queue to be executed. You can create a queue or use the default one. Make sure you have an active agent listening to that queue. You can run an agent inside your Dagster instance, or consider using a deployable agent in Kubernetes.
Refer to the Launch page.
You can also view descriptions for all properties in Launchpad.
Best practices
The following recommendations help you get the most out of the integration once you have it working end to end.Use the IO Manager to read and write Artifacts
Avoid usingArtifact.download() or Run.log_artifact() directly. The integration handles those methods. Instead, return the data you want to store in the Artifact and let the integration do the rest. This approach provides better lineage for the Artifact.
Only build an Artifact object yourself for complex use cases
Return Python objects and W&B objects from your ops and assets. The integration handles bundling the Artifact. For complex use cases, you can build an Artifact directly in a Dagster job. Pass an Artifact object to the integration for metadata enrichment, such as the source integration name and version, the Python version used, the pickle protocol version, and more.Add files, directories, and external references to your Artifacts through the metadata
Use the integrationwandb_artifact_configuration object to add any file, directory, or external references (Amazon S3, GCS, HTTP, and so on). See the advanced example in the Artifact configuration section for more information.